How to install C Compiler and make VS Code ready for Getting Started with C
Getting started with C - 01
- Installing VS Code (IDE)
- Setting it up for an optimised experience
- Installing C Compiler
Watch Full Installation Video
It's my guarantee after watching my video you won't be left with any confusion. Link down below:
Installing VS Code
Step 01: Click on the given link Click here
3.1: Accept the Agreement and click on Next.
3.2: You can change the location where you want to install. I will recommend going with the default location. Click on Next.
3.3: Click on Next.
3.4: Enable all the options. Which are Created Shortcut, Add "Open with Code" like given in the image below. And click on Next.
3.5: Click on Install.
3.6: Click on Finish.
Now, VS CODE will open up for the first time. So it will take a while.
Setup VS Code for C programming
Make sure you are connected to the internet.
Step 01: Click on the Extension icon on the left of the screen. Type C/C++ click on the C/C++ Extension given by Microsoft.
Step 02: Click on Install.
Use of Code Runner: It will give you a play-like button on the top right. And it will compile and run your code.
Step 03: Now go to Settings. It's gear like icon ⚙️ in the bottom left of the screen.
Step 04: Search Code Runner. Scroll down and find and enable Code Runner: Run Code in Terminal.
Step 05: Search Zoom. And enable Zoom using the mouse wheel.
Downloading C Compiler
Step 01: Click on the given link Click Here. It will redirect you to the MSYS2 page.
Step 02: Click on Next > Next > Install (I will recommend sticking with default locations and settings).
Step 03: After installation is completed click on Finish. It will automatically open a terminal window.
Step 04: Paste the code: pacman -Syu
Step 05: It will ask for your choice: Type Y (in Capital).
Step 06: After another choice, it will say that the terminal window will automatically close for completing some internal installation. Type Y & Terminal window will Close.
Step 07: Paste the code: pacman -Syu
Step 08: It will ask for your choice: Type Y (in Capital).
Step 09: When it's completed. Now, copy and paste the code:
pacman -S --needed base-devel mingw-w64-x86_64-toolchain
Step 10: It will ask for your choice: Type Y (in Capital).
NOTE: It will take some time to complete and can frequently give you errors based on your internet speed so, don't worry just repeat step 09 again and again until it gets successfully completed.
After this close the terminal window. Now you have to edit ENVIRONMENT VARIABLES.
Editing Environment Variable
Step 01: Go to the location where you have installed MSYS2. If you follow with default settings as I have recommended before it must be as follows, so just copy and paste the given location: C:\msys64\mingw64\bin
If it's, not go you your location > mingw64/mingw32 > bin and copy the path.
Step 02: Search for Environment Variables from the Windows taskbar open it.
Step 03: A new dialogue window appears in the bottom right of it there is one option called Environment Variables Click on it.
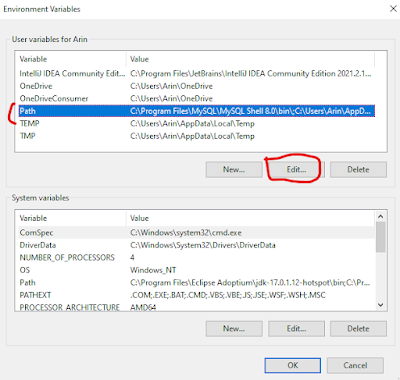
Step 04: Click on Path and Click on Edit.
Step 06: Now Click on Ok >> Ok >> Ok.
Check everything is good or not.
Open Command Prompt by Searching it from the taskbar. and type: g++ --version
If you get something like this...
Congratulations!! you have installed the C compiler successfully in your machine. if not check out the video or revisit the blog.


